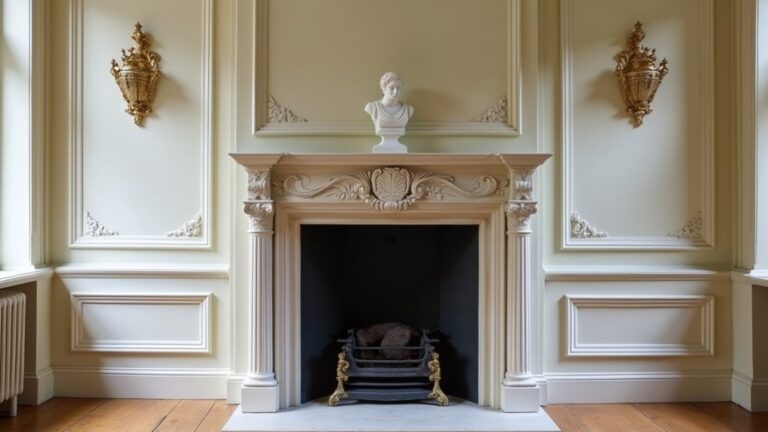
You can’t restore a period fireplace well until you know exactly what you’ve got—Victorian cast iron, Georgian stone, Arts and Crafts tile—and whether it’s structurally sound. Start with a careful inspection for loose masonry, failed mortar, and blocked flues, then clean with the gentlest methods that keep patina intact. When repairs are needed, match original materials and profiles, not modern substitutes. The tricky part is choosing finishes that look right and last…
Identify What Kind of Period Fireplace You Have

Before you lift a tool or order replacement parts, you need to identify exactly what kind of period fireplace you have, because the correct restoration approach depends on its era, construction, and original fuel type.
Date it by reading the surround’s profile, the firebox proportions, and any maker’s marks on grates, inserts, or tiles.
Determine whether it was built for open coal, wood, or a later gas conversion by noting ash dumps, hob grates, and pipe entry points.
Confirm construction: brick core with lime mortar, stone jambs, cast-iron insert, or tiled register plate.
Record dimensions, fixings, and later alterations so you don’t misinterpret replacements as original features.
This documentation protects Historical accuracy and Material authenticity when you source matching stone, ironwork, or tiles.
Check the Fireplace Is Safe Before Restoring
Once you’ve identified the fireplace’s period and original fuel type, treat safety as your next checkpoint so you don’t preserve a hazard along with the history. Start with Safety testing: book a qualified sweep or fireplace specialist to smoke-test the flue, check draw, and inspect for soot blockages, liner failure, or leaking joints.
Then complete a structural assessment. Examine the hearth for settlement, cracked tiles or stone, and inadequate projection to current codes. Check the fireback, throat, and gather for spalling, loose bricks, or missing refractory mortar.
Look for heat damage on the surround, gaps around the register plate, and staining that suggests past chimney fires or water ingress. If you find movement, bulging masonry, or persistent damp, stop and seek conservation-minded repair before any use.
Clean a Period Fireplace Without Stripping Patina
Although a deep scrub can make a fireplace look “new,” you’ll get a better restoration by cleaning just enough to remove soot, salts, and greasy deposits while leaving the aged surface and tool marks that give period materials their character.
Start dry: vacuum with a soft brush and lift loose soot with a smoke sponge, working top to bottom.
For grime, use deionized water with a pH‑neutral, non-ionic detergent on cotton pads, rolling rather than scrubbing, and stop as soon as the pad stays clean.
Rinse sparingly and dry immediately to prevent tide marks.
Avoid Modern cleaning shortcuts like bleach, acids, steam, or pressure washing; they etch stone and strip finishes.
Skip aggressive Surface polishing; if needed, buff gently with a dry cloth only.
Repair a Period Fireplace With Matching Materials
To repair a period fireplace properly, you’ll source authentic replacement brick, stone, tile, or cast-iron elements that match the original in size, density, and profile.
You’ll then match the mortar’s composition, color, and joint tooling—and replicate the historic finish without sealing in moisture.
Finally, you’ll feather in repairs so they read as continuous with the surrounding patina, not as crisp new patches.
Source Authentic Replacement Materials
Before you lift a trowel or order parts, identify exactly what your fireplace was built from and source replacements that match it in composition, size, finish, and era. Inspect firebrick stamps, stone type, and casting marks, and photograph profiles and mouldings for reference.
Use Modern tools like calipers and a moisture meter to confirm dimensions and condition, but rely on Vintage techniques such as rubbing stone samples and comparing soot patina to gauge age.
Buy reclaimed firebricks, lintels, tiles, and surrounds from architectural salvage yards, demolition contractors, and specialist reclaim dealers. Ask for provenance, batch consistency, and any prior heat exposure.
If you must use new stock, choose traditionally made units with matching density, porosity, and thermal rating. Keep receipts and spec sheets for records.
Match Mortar And Finish
Once you’ve sourced authentic units, you need mortar and finish that behave like the originals under heat, moisture, and movement. Start by identifying what’s there: lime-based mortar in older brickwork, gypsum plaster around surrounds, or clay bedding behind tiles. Match strength and permeability; don’t trap moisture with hard Portland cement where historic lime should breathe.
Use graded sands to replicate joint texture and color, and keep joint widths consistent with adjacent work.
For tiled inserts, choose a heat-rated adhesive and grout that won’t craze, then align joints so Tile patterns read continuously across repairs.
When addressing wood or stone, select finishes compatible with Mantel styles—shellac, wax, or breathable mineral paint—so sheen and protection match original intent. Test mixes in small, hidden spots first.
Blend Repairs With Patina
Although fresh mortar, brick, tile, or timber can look jarringly “new” against an aged surround, you can blend repairs into the existing patina without faking history or burying evidence of work.
Start by matching physical properties: density, porosity, and texture must align so new pieces weather at the same rate as old. Source reclaimed units where practical, or order handmade brick and tile that replicate size and firing variation.
Use lime-based mortars and breathable finishes, then tone only after curing. Apply light mineral washes, soot-tinted limewash, or casein glazes in thin layers, stopping before uniformity.
Don’t seal with acrylics; they trap moisture and glare. When modern techniques or contemporary materials are unavoidable, keep them reversible and visually subordinate.
Choose Finishes That Suit Your Fireplace’s Era
You’ll get the most authentic result when you match finishes to your fireplace’s original era, using period-appropriate materials like limewash, shellac, cast-iron blacking, or mineral paints rather than modern high-gloss coatings.
Choose historically accurate colors by referencing paint analysis, surviving protected surfaces, or local conservation guidance, then test samples under the room’s lighting.
If you keep materials and color palettes era-correct, you’ll preserve both the fireplace’s character and its long-term performance.
Match Period-Appropriate Materials
Because a period fireplace reads as a single, unified composition, you should match materials and finishes to its original era before you touch a single surface. Identify what you’re working with—marble, limestone, slate, cast iron, glazed tile, or timber—and confirm it with close inspection and simple tests, not assumptions.
Use Modern cleaning techniques only when they’re proven compatible with historic substrates; gentler chemistry and controlled abrasion protect tooling marks and patina.
When repairs are needed, source like-for-like stone, period-profiled tile, and properly seasoned wood; match density, porosity, and joint geometry so movement and moisture behave as originally intended.
Avoid synthetic materials such as acrylic fillers, resin “stone,” and high-build sealers that trap salts and telegraph edges. Choose lime-based mortars where appropriate and keep interventions reversible.
Select Historically Accurate Colors
Before you pick up a brush, pin down the color language your fireplace’s period actually used, then let that evidence drive every finish choice. Start with physical clues: scrape tests through later paint, soot-darkened recesses, and protected edges behind trim. Cross-check findings with dated pattern books, local conservation guidance, and neighboring houses of the same build.
Build a tight Color palette: limewash whites and soft earth tones for early work, richer Victorian greens and oxbloods for later schemes, and restrained off-whites with dark grates for Edwardian rooms. Prioritize Historical accuracy over trend—choose breathable mineral paints for masonry, heat-rated enamel for metal, and reversible coatings where possible. Keep sheen low, avoid stark modern brights, and let patina remain visible.
Know When to Hire a Fireplace Restoration Specialist
Even if you’re comfortable with basic cleaning and minor cosmetic repairs, certain signs mean it’s time to bring in a fireplace restoration specialist. Hire help if you see spalling brick, loose lintels, cracked hearth slabs, salt blooms, or soot staining that returns after cleaning.
If the surround is marble, encaustic tile, or carved timber, don’t risk abrasion or harsh solvents that erase tool marks and patina.
Call a professional when you suspect hidden chimney defects, failed flue liners, or poor draft—these problems affect DIY safety and require inspection, smoke testing, and code-aware repair.
A specialist will match historic mortars, replicate missing details, and use Modern techniques like gentle micro-abrasion, poulticing, and reversible consolidants to stabilize fabric without over-restoring.
Frequently Asked Questions
Do I Need Planning Permission or Listed Building Consent to Restore My Fireplace?
You might need planning permission or listed building consent, especially if you alter structure, chimney, or hearth. Check preservation regulations and seek your conservation officer’s advice to protect historic authenticity; like-for-like repairs usually don’t require it.
What’s the Typical Cost Range for Restoring a Period Fireplace?
You’ll typically pay £300–£1,500 for light restoration, £1,500–£5,000 for major repairs, and £5,000+ for specialist work. Costs depend on fireplace materials, damage, labour, and achieving historic accuracy with appropriate finishes.
How Long Does a Full Fireplace Restoration Usually Take?
You’ll usually spend 1–4 weeks on a full restoration; it’s a slow-burning torch. Fireplace materials dictate curing times, while restoration techniques like repointing, casting repairs, and flue relining extend schedules without compromising authenticity.
Can I Convert a Period Fireplace to Gas or Electric Without Damage?
Yes, you can convert it to gas or electric without damage if you use a reversible insert, avoid altering the surround, and follow Safety regulations, preserving Historical authenticity through minimal, concealed venting and wiring.
Will Restoration Affect My Home Insurance or Require Updated Certification?
Yes—restoration can affect insurance, and you’ll often need updated certification. Like a hearth’s seal, insurers want proof: compliant Fireplace materials, documented Restoration techniques, and inspection sign-off (chimney, flue, gas/electric) for cover.
About the Author